

Instructions are provided to make it easy for you to install and use VNC Sara. However if you find they are not clear please feel free to email me or post on sourceforge with your suggestion.
At this point it is assumed you have some basic computer skills. VNCSara is currently not a finished product and the install process is far from slick.
VNCSara can be installed on the following platforms
- Linux (Tested on Ubuntu 9.10)
- Mac OSX (Tested on Snow Leopard)
- Windows (Tested on windows XP)
Prerequisites
- VNC Server must already be installed and working correctly on any of the computers you want to control
You can find VNC Server from locations like http://www.realvnc.com/ or http://www.tightvnc.com/
Please note: OSX and most distributions of Linux use VNC as there default desktop shareing tool and it's install by default. Normally you just have to enable desktop sharing. No versions of windows come with VNC pre installed so you will always have to install vnc.
I do not support, advise on nor endorse any versions of VNC.
- You have downloaded the appropriate file from https://sourceforge.net/projects/vncsara/files/
If you prefer you can watch a video of how to get started on windows from here. The video is quite large (8MB) which may not be appropriate for some people.
PLEASE NOTE: VNCSara is in the early stages of development. It will not yet install itself as a service so you will need to either create it as a service yourself or create a login script that will start VNCSara when you logon. I will not provide support on how to do this as it is something that will eventually be put into the install procedure.
Windows Install
- Run the setup.msi file and follow on screen instructions.
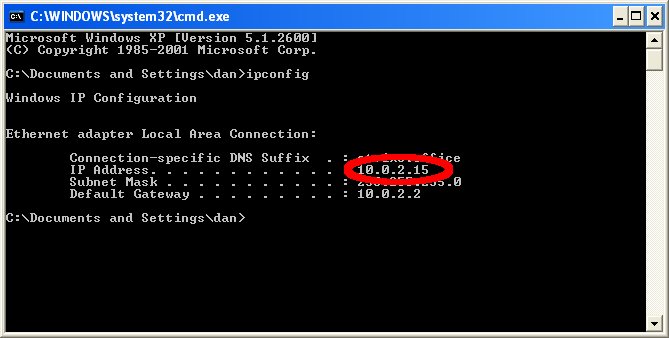
- Now click start > run and type cmd followed by pressing the enter key.
- This should take you in to dos.
- Now navigate to VNCSaras install directory.
cd c:\
cd program*
cd etrixs*
cd vnc*- Now we need to find out the ip address. Type ipconfig and press the enter key .
- Locate your ip address
- Now simply type vncsara 10.0.2.15 80 this starts VNCSara running and listening for connection on port 80 at the given ip address.
- Now to get started open a browser and in the address bar type http://10.0.2.15 and press the enter key.
- You should now see the initial VNCSara login page.
- Create yourself a username and password (Please remember these).
- Congratulations you're done!
OSX Install
- Run the VNCSara.mpkg, if it didn't run automatically, follow the on screen instructions.
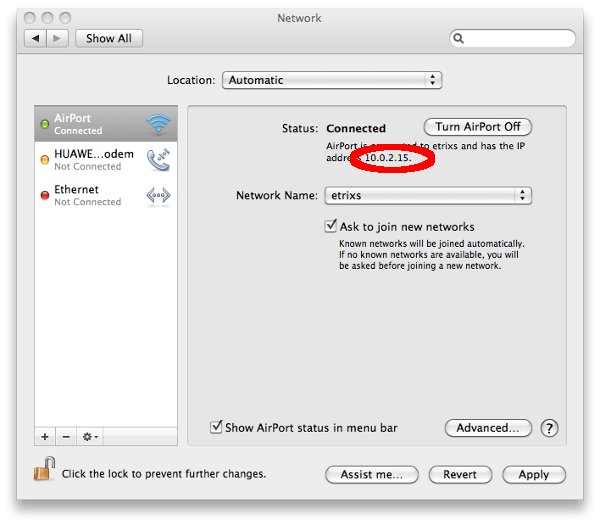
- Now go to system preferences followed by network.
- On this screen you will see your current ip address within the status section. Make a note of this address
- Now open a terminal window. You can find terminal in the utilities menu.
- Whilst keeping terminal open, open the applications folder and the VNCSara folder
- In the VNCSara Folder there is a file called VNCSara, drag this file onto the terminal window.
- Now in the terminal window you should see the path of VNCSara it should lokk something like:
/Applications/VNCSara/VNCSara
- Now after this type the ipaddress you made a note of earlier. I had 10.0.2.15, so enter that followed by a space and then the number 8080 and press enter.
- Now to get started open a browser and in the address bar type http://10.0.2.15:8080 and press the enter key.
- You should now see the initial VNCSara login page.
- Create yourself a username and password (Please remember these).
- Congratulations you're done!
Linux Install
Sorry these instructions aren't that detailed but if you use linux, you probably know exactly what I'm talking about!
- Download VNCSara_Linux.tar.gz
- Sorry no install for this just unzip the tar.gz file
- Open terminal and navigate to the folder you've just unzipped
- Find out the ipaddress of the computer, mine is 10.0.2.15
- Type VNCSara 10.0.2.15 80 and press the enter key
- Now to get started open a browser and in the address bar type http://10.0.2.15 and press the enter key.
- You should now see the initial VNCSara login page.
- Create yourself a username and password (Please remember these).
- Congratulations you're done!
© Dan Holliday. 2010
This software is distributed in the hope that it will be useful,
but WITHOUT ANY WARRANTY; without even the implied warranty of
MERCHANTABILITY or FITNESS FOR A PARTICULAR PURPOSE